promis je suis ton conseil.…..heuuu lequel déja ?????
Stan Wilson
64 messages • Page 3 sur 5 • 1, 2, 3, 4, 5
Re: Stan Wilson
![]() par davidoff » 17 Déc 2008 21:30
par davidoff » 17 Déc 2008 21:30
Stan ,
promis je suis ton conseil.…..heuuu lequel déja ?????
promis je suis ton conseil.…..heuuu lequel déja ?????
- davidoff
- Reggio
- Messages: 373
- Inscrit le: 14 Nov 2008 11:20
Re: Stan Wilson
![]() par deovolens » 17 Déc 2008 22:33
par deovolens » 17 Déc 2008 22:33
Demain toutes les liquidités seront liquides en cash
- deovolens
- XX Hell
- Messages: 6672
- Inscrit le: 17 Sep 2007 21:23
- Localisation: Belgique
Re: Stan Wilson
![]() par davidoff » 18 Déc 2008 07:44
par davidoff » 18 Déc 2008 07:44
deovolens a écrit:Demain toutes les liquidités seront liquides en cash
Fait.…..soif par ici !!
- davidoff
- Reggio
- Messages: 373
- Inscrit le: 14 Nov 2008 11:20
Re: Stan Wilson
![]() par Dark_Angel » 18 Déc 2008 08:25
par Dark_Angel » 18 Déc 2008 08:25
stancaiman a écrit:en ce moment.
donc c'est le moment de ?
c'est exact, c'est toujours quand personne n'a de tune, qu'il faudrait investir
FAN de Blem
FREE EDITING LIGUE
FREE EDITING LIGUE
-

Dark_Angel - Minute of Angel
- Messages: 5560
- Inscrit le: 26 Sep 2008 23:32
- Localisation: 33
 рганизация
Re: Stan Wilson
![]() par Dark_Angel » 18 Déc 2008 10:57
par Dark_Angel » 18 Déc 2008 10:57
stancaiman a écrit:en quelqu'un qui suit -ouf-
a ton service
FAN de Blem
FREE EDITING LIGUE
FREE EDITING LIGUE
-
Dark_Angel - Minute of Angel
- Messages: 5560
- Inscrit le: 26 Sep 2008 23:32
- Localisation: 33
Re: Stan Wilson
![]() par Blastmaster1972 » 20 Avr 2010 07:02
par Blastmaster1972 » 20 Avr 2010 07:02
Spéciale pour mon ami tetocube  :
:
C'est pas un couteau que je vais acheter, mais c'est très bien fait. Quelques photos "WIP", que j'ai vu sur "bladeforums":
a suivre...
C'est pas un couteau que je vais acheter, mais c'est très bien fait. Quelques photos "WIP", que j'ai vu sur "bladeforums":
ArsMachina a écrit:Hi,
some time ago I lurked around in a flashlight collectors forum (another of my hobbies) and saw a picture of a knife, that really completely took my breath.
I had never before seen such a wonderful knife, and I was already collecting knives these days...
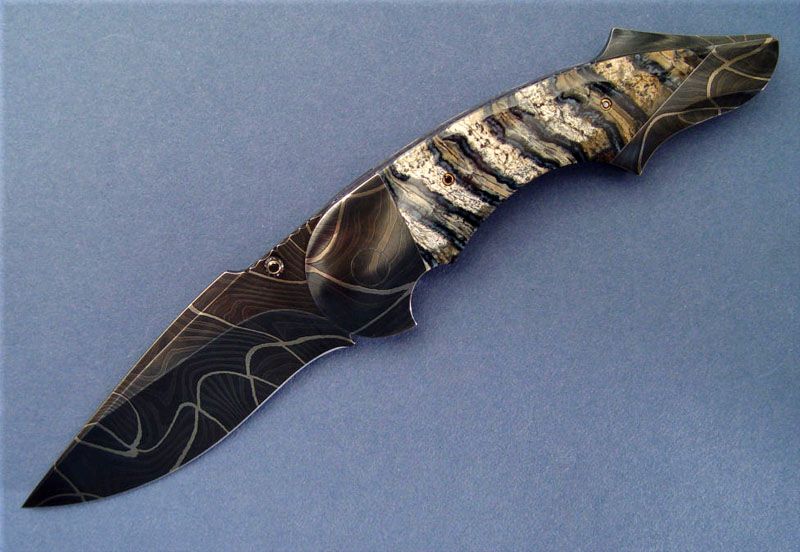
I found out that it was an Advisor III made by Stan Wison and here it is:
The very same day I contacted Stan by mail, had a nice discussion with him and for sure ordered my own Advisor.
Looking at all the other knifes he ever made at his great website, I fell in love with Bertie Rietveld's Dragonskin Damascus as well as with Mammoth Tooth scales.
So my dream combination was found very quickly.
Stan, who is always making one complete knife after another, told me about 10-12 month to wait until he can start the work at my knife.
Finally it took somewhat longer because Stan moved his workshop during this waiting period and also it is not too easy to get some of Berties rare Dragonskin Damascus, which he does not produce too often.
We also did not find a pair of Mammoth Tooth scales that really met my taste - finally I found such a pair myself at an internet shop, got them shipped to me in Germany and then sent them back to Stan.
Here they are:
So earlier this year all materials for my knife were complete and last week Stan sent me an email telling me that he start making my knife.
We both found that it would be a nice idea to show Stan's work and the progress of the knive in a "making of" thread here in the forum.
And that is what I am now doing here I hope youlike it.
Please excuse my poor english, but for me it is a foreign language and I am really trying my best.
All further comments to the work progress pictures are from Stan himself, sent to me together with the pictures.
Lets start with a picture of Stan in his new workshop and with the material for my knife on his desk.
Here is the Damascus with the blade and spine marked out for rough cutting. Whenever I finish a knife I trace all the parts, if I need to duplicate the same blade shape I then copy the tracing and cut out paper templates for that particular variation of the knife.
I sanded a strip of Titanium to remove all manufacturing marks and scratches, made sure it is nice and flat. here it is marked out and ready for cutting.
I cover the back side of the ti so to not scratch it up when cutting or sanding, I have the front liner rough cut to shape and I will leave the back one as it is for now.
I drilled the pivot hole and one of the pin holes in the top liner and now I will transfer those 2 holes to the back liner.
The 2 liners can now be pinned together.
Band saw off the excess from the bottom liner.
Then to the belt grinder and sand close to the lines.
To be continued... Jochen


a suivre...

-

Blastmaster1972 - Messages: 368
- Inscrit le: 23 Oct 2008 12:15
- Localisation: Belgique
Re: Stan Wilson
![]() par Blastmaster1972 » 20 Avr 2010 07:04
par Blastmaster1972 » 20 Avr 2010 07:04
Suite:
a suivre...
ArsMachina a écrit:Part II
I cut out the blade and spine are rough cut.
Then ground close to the final shape.
They are a little thicker than I want them so it's surface ground closer to the final dimension.
The blade and spine are profiled to fit, 2 holes are drilled into the spine and it can be pinned to the liner.
Here it is closed, I still need to take a little off the inside of the spine.
The back of the blade is sand down till I get a nice fit against the spine and the tip of the blade is as high as it should be.
Now I will pin the knife together completely and sand the back of the blade, spine and liners down to the line.
Next I will drill the screw holes for the frame.
Holes have been drilled with a # 55 drill, this is the tap size for a 0-80 screw.
The top liner and the spine need to be drilled out to clearance size, I will remove the back liner and drill the top liner and spine as one .
Every hole that is drill gets deburred, I have a small drill pres set up just for this. I use an 1/8 " carbide spade bit for most holes.
All my drill presses and many other machines are set up with fott pedals, step on the petal and press the part into the bit.
To be continued …


a suivre...
-
Blastmaster1972 - Messages: 368
- Inscrit le: 23 Oct 2008 12:15
- Localisation: Belgique
Re: Stan Wilson
![]() par Blastmaster1972 » 20 Avr 2010 07:06
par Blastmaster1972 » 20 Avr 2010 07:06
suite:
a suivre...
ArsMachina a écrit:Part III
Next I will tap the holes in the back liner, here is my tapping setup. It is one of the old "turn your hand drill into a drill press things"
I took out the spring and mounted a cordless screwdriver in it.
Tapping the liners.
Next I will counter bore the top liners for the screws. My main drill press is a mill/drill with a digital downfeed readout.
Zero the drill bit onto the liner and counter bore to the exact depth needed.
I use a #40 drill bit for this and I will turn the head of a flat head screw down to size.
Screw hole have been drilled, counterbored and tapped.
Next I go to the mini lathe to turn down some screws.
Turning down the screw heads.
After the heads have been turned down I want to shorten the heads a little. I have a plate to mount the screws into for this.
After a quick hit on the disc sander.
I can now screw the frames together. My screws are now slightly recessed below the liner.
The screws are still too long so I clip them off with a modified wire cutter and sand then flush.
To be continued …


a suivre...
-
Blastmaster1972 - Messages: 368
- Inscrit le: 23 Oct 2008 12:15
- Localisation: Belgique
Re: Stan Wilson
![]() par Blastmaster1972 » 20 Avr 2010 07:08
par Blastmaster1972 » 20 Avr 2010 07:08
suite:
a suivre...
ArsMachina a écrit:Part IV
Next is cutting out the bolsters, I have them marked out on the Damascus.
Cutting the bolsters.
Next I will rough in the dovetail angle on the bolsters.
Bolsters are roughed out.
I will now surface grind the dovetails, I have an angle fixture just for this.
I clamp the bolster to the fixture.
Making sparks with the surface grinder.
Perfectly flat dovetail.
Next I will use a filing jig to set my bolsters.
To be continued …


a suivre...
-
Blastmaster1972 - Messages: 368
- Inscrit le: 23 Oct 2008 12:15
- Localisation: Belgique
Re: Stan Wilson
![]() par Blastmaster1972 » 20 Avr 2010 07:10
par Blastmaster1972 » 20 Avr 2010 07:10
suite:
a suivre...
ArsMachina a écrit:Part V
Line up the filing jig to the bolster line and tighten it down.
A few drops of super glue and the front bolsters are in place
Move the jig to the line for the back bolsters.
More super glue and now the back bolsters ire in place.
Remove the jig and now I can carefully disassemble the knife.
With the bolsters glued to the liners I go back to the drill press and I drill the screw holes through the liners into the bolsters.
When all the holes have been drilled a sharp tap on the bench will pop the bolsters off the liners. An acetone bath dissolves all the super glue.
Now I can tap the bolsters, first I will give each hole a slight chamfer to help in tapping. Here one hole is chamfered.
I made a depth guide for doing the blind tapped holes, I set the depth according to how deep the hole is drilled.
In this case the holes in the bolsters were drilled .060 deep I set set the depth guide to .050
First hole is tapped, the guide has bottomed out evenly across the back of the bolster.
To be continued …


a suivre...
-
Blastmaster1972 - Messages: 368
- Inscrit le: 23 Oct 2008 12:15
- Localisation: Belgique
Re: Stan Wilson
![]() par Blastmaster1972 » 20 Avr 2010 07:11
par Blastmaster1972 » 20 Avr 2010 07:11
suite:
a suivre...
ArsMachina a écrit:Part VI
Counter boring the liners for the bolster screws. I will modify 8 more screws like I did the frame screws.
Bolsters are screws in place.
Bolsters have been ground close to the liners, I will assemble the knife and grind them right to the liners.
Profiled and ready for the next phase. Surface grind the blade, filework and heat treat.
To be continued …


a suivre...
-
Blastmaster1972 - Messages: 368
- Inscrit le: 23 Oct 2008 12:15
- Localisation: Belgique
Re: Stan Wilson
![]() par Fabian » 20 Avr 2010 07:15
par Fabian » 20 Avr 2010 07:15
attention attention, ici c'est AVANT les railleries... ça va créer un facheux précédent.
fameux travail en tout cas... à coté de ça ,… m'en faut pas dans ma poche
fameux travail en tout cas... à coté de ça ,… m'en faut pas dans ma poche

-

Fabian - Le Silure
- Messages: 6744
- Inscrit le: 18 Juin 2007 09:34
- Localisation: Besançon - franche comté - sibérie australe
Re: Stan Wilson
![]() par kurios » 20 Avr 2010 07:25
par kurios » 20 Avr 2010 07:25
Effectivement, travail de très haute qualité, après on aime ou pas le style...
Et paf!
-

kurios - Scalpel à tarte
- Messages: 13181
- Inscrit le: 29 Déc 2009 21:47
- Localisation: Thory 89
Re: Stan Wilson
![]() par GC » 20 Avr 2010 20:33
par GC » 20 Avr 2010 20:33
superbe tuto vite la suite 
pour le style du couteau c'est pas le mien mais il faut avouer que c'est du super boulot
pour le style du couteau c'est pas le mien mais il faut avouer que c'est du super boulot
Salutations LCDVC
mon blog http://lacoutellerieduvieuxchene.blogspot.fr/.
Visitez ma page Facebook: www.facebook.com/LCDVC
mon blog http://lacoutellerieduvieuxchene.blogspot.fr/.
Visitez ma page Facebook: www.facebook.com/LCDVC
-

GC - Célestin
- Messages: 3697
- Inscrit le: 28 Juin 2007 09:40
64 messages • Page 3 sur 5 • 1, 2, 3, 4, 5
Qui est en ligne ?
Utilisateurs parcourant actuellement ce forum : Google [Bot] et 45 invités